

A client sends a message that sounds simple: “The USB drive says it's write-protected.” In practice, that ticket can burn far more time than it should. One tech starts changing Windows settings, another edits the Registry, and half an hour later the problem turns out to be a tiny lock switch on the device.
That's why how to disable write protection should be handled like a layered troubleshooting process, not a random sequence of guesses. For an MSP, vCISO, or reseller, speed matters, but so does control. You need a fix that works, a method that junior techs can follow, and a process that doesn't create new risk on the client endpoint.
Write protection also isn't always the enemy. Sometimes it's a nuisance. Sometimes it's a deliberate safeguard tied to security, forensics, or policy. If you manage environments with SOC 2, HIPAA, PCI DSS, or ISO 27001 concerns, that distinction matters.
Starting with Simple Hardware Checks
The fastest fix is often the one people skip. On SD cards and some USB flash drives, a physical write-protect switch or tab can block all write activity. If that switch is locked, software changes in Windows won't override it, so checking the device first is the right starting point according to ITU Online's write protection guidance.

What to inspect on the device
Before you open Command Prompt or Registry Editor, physically inspect the media.
- Check the card edge or drive body: SD cards usually place the tab on the side. Some USB drives hide it along the casing.
- Move the switch fully: A half-position can still read as locked depending on the reader or adapter.
- Reinsert the media after changing it: Remove it, toggle the switch, then reconnect it so the host sees the new state.
This sounds basic because it is. It's also one of the easiest places to save labor on a client ticket.
Practical rule: If the media has a physical lock, start there. Windows can't talk its way past hardware.
Why MSP teams should care
For a service desk, this is a workflow issue. If your team jumps straight into software remediation, you create avoidable handling time and increase the chance of unnecessary changes on a client workstation.
A good triage script is simple:
- Ask what type of media is involved.
- Confirm whether the device has a lock switch or tab.
- Have the user toggle it to writable and reconnect it.
- Test a small file write before escalating.
If the write fails after that, you've ruled out the easiest cause without touching system settings. That matters when the endpoint is under compliance controls, endpoint management, or restricted admin access.
What usually does not work
If the switch is locked, DiskPart won't fix it. Registry edits won't fix it either. Reformatting won't help if the hardware lock is still engaged.
When the basic hardware check fails to solve it, move to software attributes. That's where most Windows-side write protection issues are cleared.
Using Windows DiskPart for Attribute Fixes
When the device isn't physically locked, DiskPart is the standard Windows fix for a disk-level read-only attribute. For MSP troubleshooting, the practical sequence is to confirm hardware first, then test DiskPart, then check Registry policy, because hardware, disk metadata, and OS policy can each enforce write protection independently, as outlined in NinjaOne's Windows write protection workflow.
The exact DiskPart workflow
Open Command Prompt as an administrator, then run:
diskpartlist diskselect disk <n>attributes disk clear readonly
That command clears the read-only attribute on the selected disk.
The part that can go wrong
The technical risk here isn't the command itself. It's choosing the wrong disk.
DiskPart acts on the selected device immediately. On a busy workstation or server with multiple attached drives, guessing based on drive letter is sloppy. Verify by drive size and device context before you clear anything.
Match the removable device by size first. If the numbers don't line up with what the user plugged in, stop.
A safe service-desk method
Use this short process when a tech is remote on a client endpoint:
- Confirm the device appearance: Have the user insert the drive while you watch Disk Management or rerun
list disk. - Compare by capacity: The removable media size should stand out against the internal system disk.
- Select carefully: Run
select disk <n>only when you're sure it's the correct target. - Clear the attribute: Use
attributes disk clear readonly. - Retest immediately: Exit DiskPart and try writing a small test file.
This works well when the issue lives at the disk-attribute layer. It's also the cleanest fix because it avoids broader policy changes.
When DiskPart is the right answer
DiskPart is usually the right move when:
SituationBest next stepUSB or removable media shows read-only behaviorUse DiskPart firstNo physical switch is presentUse DiskPart firstOne device is affected, not the whole endpointStart with DiskPartMultiple devices on the same PC are blockedCheck policy after DiskPart
The business reason is straightforward. DiskPart is targeted. It changes the attribute on the chosen disk instead of making a wider operating system change that may affect other removable devices.
If DiskPart clears the flag and the user can write again, you've solved the ticket with minimal disruption. If it doesn't, the next likely layer is Windows policy.
Advanced Fixes Using The Windows Registry
When DiskPart doesn't clear the problem, the block may be coming from the operating system rather than the device metadata. In Windows, that usually means the StorageDevicePolicies Registry path.
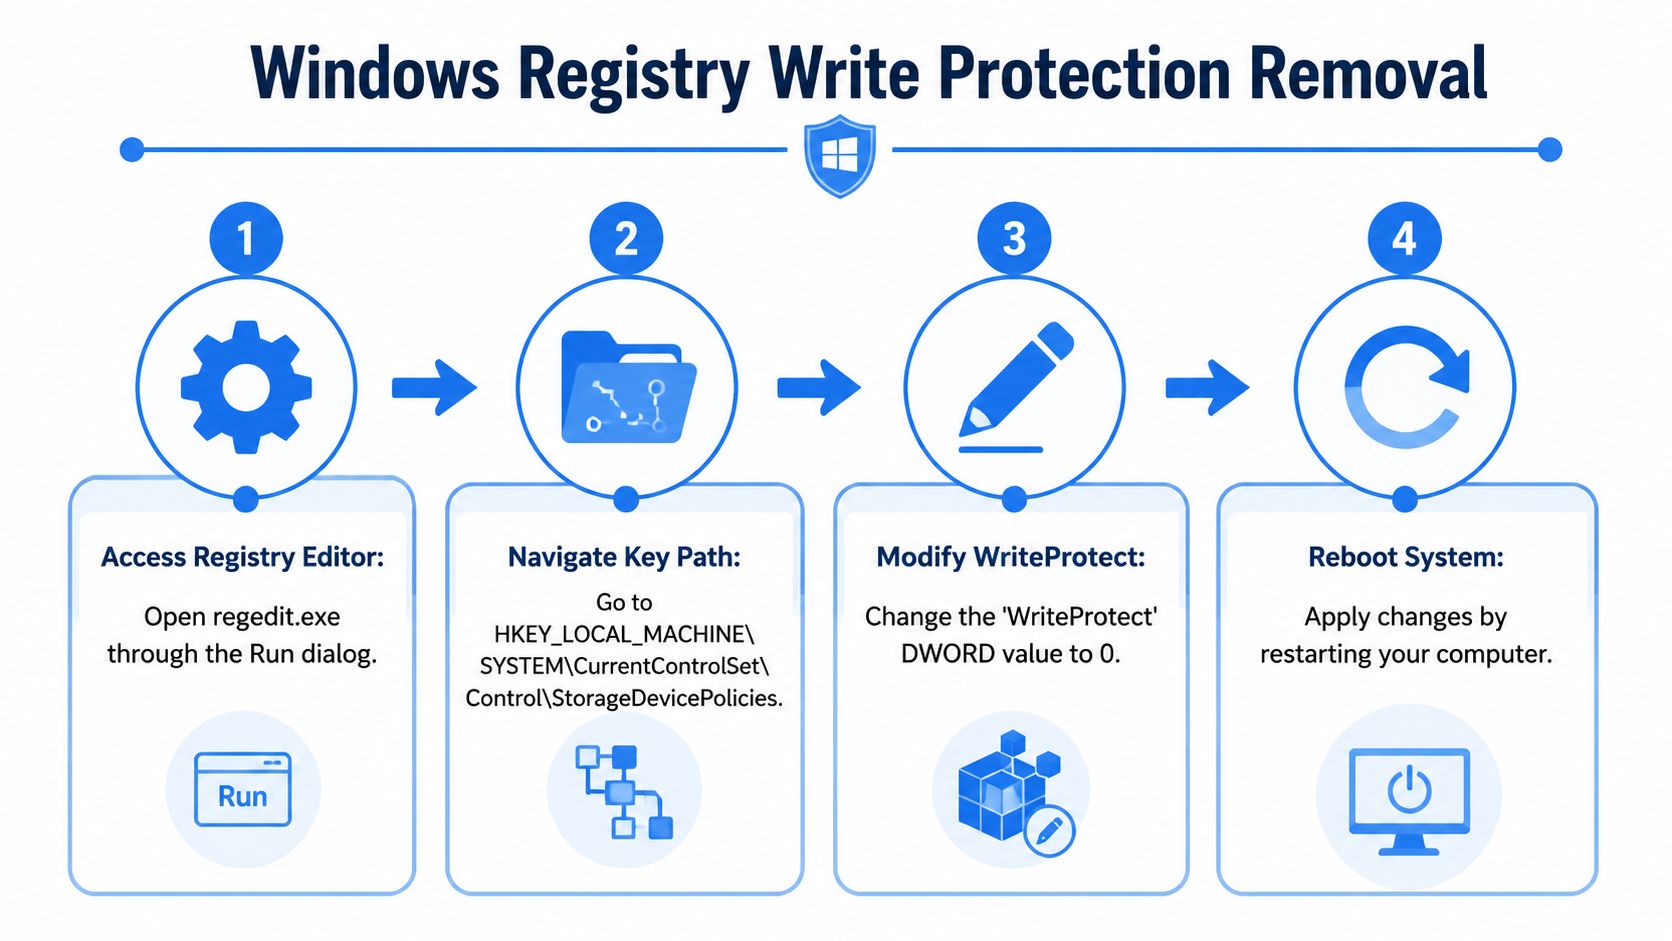
A practical remediation path is documented in Microsoft community guidance and includes both DiskPart and a Registry fallback. That guidance points to HKEY_LOCAL_MACHINE\System\CurrentControlSet\Control\StorageDevicePolicies and notes that setting WriteProtect to 0 disables protection, with hardware lock switches still being the first thing to check in the overall workflow, as described in Microsoft community guidance on write-protected media.
Registry path and setting
Open regedit.exe with administrative rights and go to:
HKEY_LOCAL_MACHINE\SYSTEM\CurrentControlSet\Control\StorageDevicePolicies
Look for a DWORD named WriteProtect.
- If
WriteProtectis1, write protection is enabled. - If
WriteProtectis0, write protection is disabled.
If the StorageDevicePolicies key doesn't exist, create it manually, then create the WriteProtect DWORD and set it to 0.
Where MSPs usually encounter this
This is common in managed environments where removable storage controls are pushed intentionally, inherited from prior policy, or left behind after a hardening change. A tech may think a USB drive is faulty when the workstation is, in fact, enforcing a broader rule.
That's why this issue belongs in your endpoint baseline documentation. If one user can't write to any removable device on the same machine, think policy before you think failed hardware.
Don't forget the reboot
A Registry change here requires a reboot to take effect. If your tech edits the value and immediately retests without restarting, they may falsely conclude the fix didn't work.
Use this checklist:
- Open Registry Editor as admin
- Go to StorageDevicePolicies
- Create the key if missing
- Set
WriteProtectto0 - Reboot the endpoint
- Retest with a small file write
Registry edits are powerful, but they're broader than DiskPart. Use them when the endpoint is enforcing policy, not as your first reflex.
For MSP owners, this is also where operational maturity shows up. A junior tech can follow the steps. A senior tech asks the better question first: is this a one-off device issue, or a managed control behaving exactly as configured?
The Role of Write Protection in Security
Write protection is frustrating when it blocks a valid task. It's valuable when you need to preserve integrity.
That's the part many teams miss. If a user can't save to a device, the instinct is to remove the control. But in security work, that control may exist for a reason. Forensics, archival handling, kiosk systems, and tightly controlled endpoints all benefit from media that can be read without being modified.
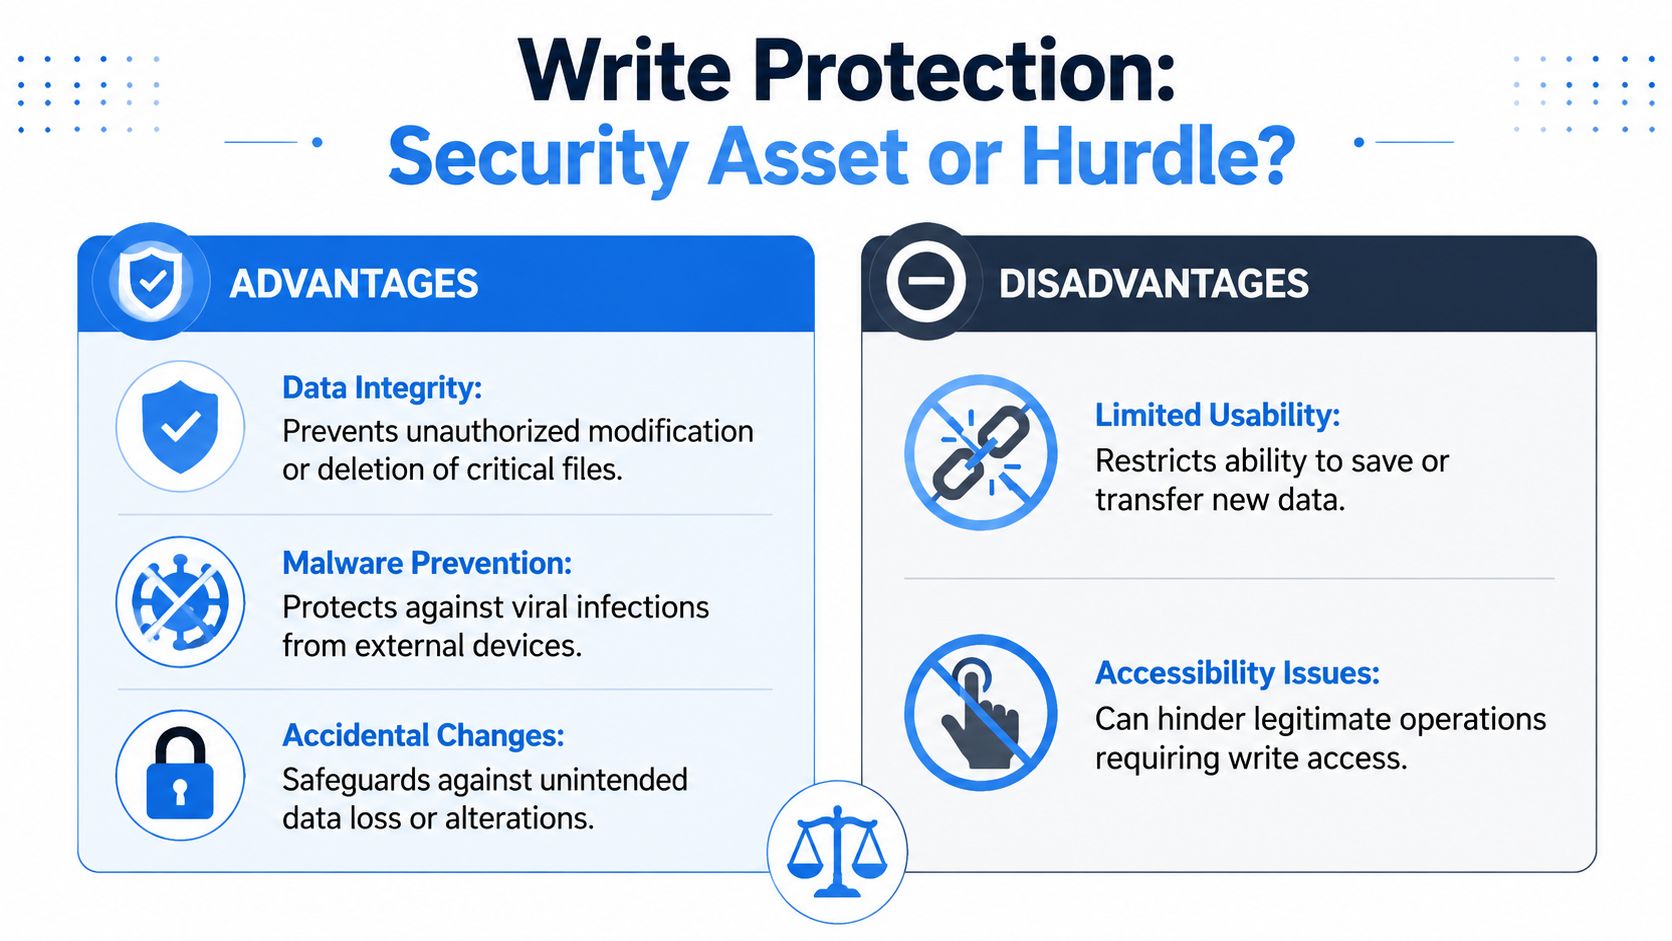
Why the control exists
Write protection protects evidence, preserves known-good content, and reduces accidental or unauthorized changes. At the firmware level, it becomes even more serious. Full disablement can require disabling hardware write protection, changing a flash-chip register to disable software protection, and clearing protected ranges, which shows how firmware protections are built to resist low-level tampering according to MrChromebox firmware write protection documentation.
That's a different category of risk from a locked USB stick. Once you touch firmware write protection, you're no longer doing routine desktop support. You're making a security-sensitive change that can affect trust, recovery, and device integrity.
Security teams should ask one question first
Before disabling write protection, ask: Is this control accidental or intentional?
- Accidental: User error, stale device attribute, broken metadata, or an inherited workstation policy.
- Intentional: Forensic preservation, kiosk lockdown, secure media handling, or anti-tamper protection.
That decision affects auditability and client trust. A rushed fix can remove a safeguard that the client needed.
For teams working on endpoint hardening and recovery planning, this connects directly to broader controls like removable media policy and malware containment. If you want a useful companion read, these ransomware prevention best practices align well with the same principle: reduce unnecessary write paths, then open them only where there's a documented business need.
Connecting Device Control to Your Security
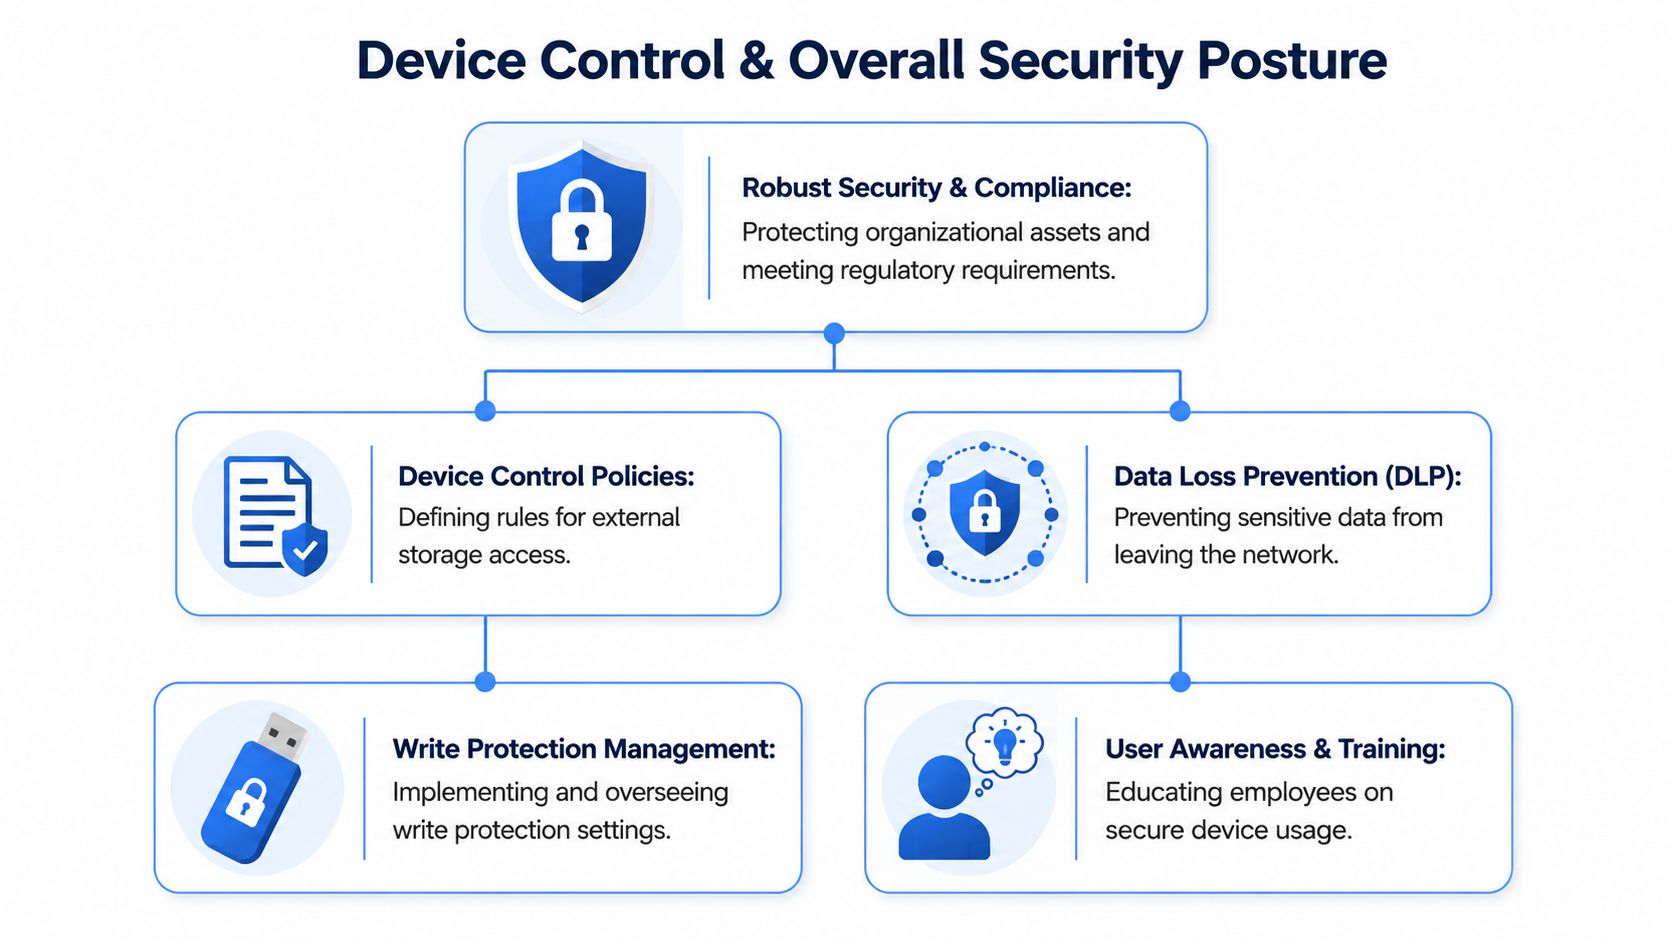
A write-protection ticket can look small. Sometimes it is. Sometimes it's evidence of a bigger control gap.
If removable media behavior is inconsistent across client systems, you may be dealing with weak endpoint standards, uneven policy enforcement, or exceptions nobody documented. Attackers love that kind of inconsistency because it gives them room to move data, introduce malware, or exploit trust in unmanaged devices.
Misconfigurations are security findings
Pentesting, pen testing, and penetration testing demonstrate their usefulness beyond obvious exploits. A strong manual pentesting process doesn't just hunt for exposed services. It also looks for policy drift, weak device control, unsafe endpoint assumptions, and gaps between what the client thinks is enforced and what users can do.
For MSPs, vCISOs, GRC firms, and compliance-focused partners, that matters. A risk assessment tied to real-world penetration testing can reveal whether removable media controls are sensible, excessive, or missing entirely.
Why this matters for compliance work
Clients pursuing SOC 2, HIPAA, PCI DSS, or ISO 27001 rarely need another generic scanner result. They need proof that technical controls match policy and business use.
That often includes questions like:
- Are endpoint restrictions consistent across managed systems?
- Can users bypass device controls too easily?
- Did a hardening policy break legitimate business operations?
- Is write protection being used intentionally or by accident?
For regional firms managing local clients, it helps to ground these discussions in practical endpoint defense. This resource on cybersecurity for Indiana companies is a useful example of how device protection choices tie into broader operational security.
You can also connect media control decisions to endpoint administration and policy enforcement through device management software, especially when removable storage behavior differs from one managed client to another.
If a client's device controls are inconsistent, that's not just an IT nuisance. It's a security story waiting to be told by an auditor or an attacker.
A partner-led pentest, penetration test, or pen test helps you tell that story first, under controlled conditions, before someone else does.
Partner With Experts for Total Security
Fixing write protection is useful. Building a repeatable security practice around endpoint control is more valuable.
For many providers, the smarter move isn't building an in-house penetration testing team from scratch. It's working with specialists who already support the channel model. That matters if you're an MSP, vCISO, reseller, CPA firm, or GRC advisor that wants to add white label pentesting without creating channel conflict.
A practical example is digital security services, where managed protection is treated as an ongoing operational discipline rather than a one-time fix. The same logic applies to validation work. MSP Pentesting provides a pentest partner program for channel firms that need affordable, manual pentesting delivered under the partner's brand by certified pentesters with OSCP, CEH, and CREST credentials.
That model fits well when your clients need help with security validation for SOC 2, HIPAA, PCI DSS, or ISO 27001, but you don't want long lead times, inflated pricing, or a vendor that competes for the client relationship.
If you want a channel-only partner for white-labeled pentest, pen testing, and penetration testing support, contact MSP Pentesting today to learn more.

.png)
.png)

